Thursday, October 30, 2008

Hello Kitty Post-it-notes...

I love these hello kitty heads (this head is from the sitting hello kitty die-it's smaller) and I wanted to make something to sell at the HGEA craft fair coming up...so my boss said she would try to sell them for me. I was so excited to try make something and this is what I came up with...hello kitty post-it-notes with pen. I do love the hello kitty even though it can be very time consuming doing the whiskers, nose and eyes...but it's all worth it.I had bought some thin coaster chipboard before and was disappointed in it and didn't know what to do with them...but I decided to try use them to make the hello kitty heads and they worked perfect! I know it's not "white" but it's close enough and so hello kitty has a slight tan. I had fun making them. I used the DP from a scrap pack I had and I matched the color cardstock for the bow, then I dazzling diamonded each and every one! I added ribbon and I bought the mini pens from Price Busters in Pearlridge. here's what it looks like on the inside.

The instructions are:
2 - 4 x 4 chipboard coasters
2 - pieces 4 x 4 designer paper
1 - 4 x 11 cardstock
score at: 4" and flip and score at 4"
corner rounder
ribbon
post-it-notes
mini pen (optional)
decorate as you choose and there you have it!
hope you all are enjoying yourself this week =)
thanks for stopping by...TTFN!

Wednesday, October 29, 2008

Hello Kitty w/ Pumpkin & RAK...

I saw this cute hello kitty w/ pumpkin stuff animal being sold at the Sanrio store...if you spent $35 or more you could get this for $5. but Kaneohe Longs is having a sale right now and I got it for a great deal! Isn't she so cute?! I had to get her for my daughter and for my BFF's daughter too =) They will just love it! and perfect timing for Halloween!What a surprise...Denise stopped by and dropped off a little gift for my daughter. She was so happy to receive such a gift. Look at all the cute bees and it's pink w/ black. the pencils were inside! If you don't know my daughter...she loves paper and pens, pencils, markers or anything to draw or write with. She was truly thrilled.

thank you so much Denise for thinking of us.
if you have a chance go check her out...Denise loves stamps
you are so sweet to always think of Taelyn.

have a good "hump" day everyone!

Tuesday, October 28, 2008

Happy Halloween...Frank-e...

I wanted to make something special for my friends...I saw this on Teri's blog and she gave me an idea...I thought that it would be too much work...and it was...lol! but it was fun making them. well, Teri got her idea from Cami at Stamp a little love baby-tutorial ...and Frank-e is so cute!
I made 16 of them...crazy yah?!
here they are...
I used old olive and kiwi kiss cardstock for their faces, lavender lace cardstock for the hair, 1" circle punch for the white of the eyes & the lids, 1/2" circle punch for the black of the eyes and the white gel pen, tab punch for the nose and I used the black pen to make his scars on his face and I had to cut out his bangs on my own. I also used the top notes diecut for the face.
I stuffed them with lots of candy...twix, dove chocolates, hershey bliss & lolipops...I cut black cardstock for the base and tied black sheer ribbon to close the top. I hope the girls will enjoy this halloween treat!

Have a great week everyone! Thanks for stopping by =)

Monday, October 27, 2008

WOW...A Blog Award...

I received an award from Lacey...my new found blog friend! She is so sweet and has such wonderful and creative ideas to share...go and check her out! so, I am supposed to tag 6 more people...I did 9 =)
Teri...my good friend who started me on SU!
Michelle...my BFF who inspired me to start this blog
Enjoli...my new found friend who is so sweet
Fay...who blogs such great ideas and creations
Jodi...who's getting married...such a sweet gal with wonderful ideas
Catherine...who I admire for being a single parent & inspires me with her creations
Jen...who is always challenging me to be creative
Marie...who is such a sweetheart and does such awesome creations
Corie...who has such fresh and new ideas to share
thank you everyone who visits me and inspires me...
I am so blessed to have such great blogging friends!!!

Friday, October 24, 2008

To all my Blogging Friends...

I wanted to wish everyone a Happy Friday...but to also say THANK YOU to all my blogging friends...I really appreciate all the visits, comments and friendship. I am inspired everyday from all the blogs I visit and the awesome creations that are made =) so here's to you all...
thank you from the bottom of my heart =)
this award is for you...
as it says:
"for showing kindness and spreading happiness"
Mahalo and Aloha!

Hinged Window Tins...

I decided one day to take my decorated hinged tin that I received from Teri to work and show the ladies what you can do...well, it was such a great hit that the women wanted to order a few... try 576 tins!!! 3 cases were shipped to my house yesterday and this is what it looked like! I had to bring them into the house...
each box was 36 lbs!
I ordered them through paper martI then decided to make all the ladies a sample of what they could do with their tins...they were very happy to see that they all got a sample they could keep =)
I made the tote bag that Enjoli made for me and I used the stamp set: only ovals for the outside. I punched it with the mega scallop punch and used the white gel pen. I used different designer paper from a scrap pack I had bought from Ben Franklin a while ago.

here I tried to make the tin match the tote bag...I think that this would be a great gift to give... any time, any occasion, whatever you may choose. I used the SU punches to make the tag, black sheer ribbon and there you have it!

TGIF!!!

have a wonderful weekend everyone!

Thursday, October 23, 2008

LCWC #14...

I decided to try another one of Jen's challenges...
This week's challenge is a sketch challenge using the sketch shown here. Pretty simple, but the 2nd part of the challenge is to NOT have a sentiment.

here's my take on it:

I love this penguin and I thought...why not use her for this challenge =) Imaginisce paper "a shore thing", flower embellishments with bling from doodlebug and can't forget the dazzling diamonds for the skirt!

hope everyone is having a great day!

Wednesday, October 22, 2008

Purple RAK from Enjoli...

WOW...what a wonderful surprise I received in the mail today...it was my RAK from Enjoli! I love purple and she was so sweet to make me a tote bag, card and note pad...look at the hello kitty...she has a purple flower too =) thank you so much for all my goodies! I love my gift...
and what was even better...I received all these goodies inside the tote bag! I am truly blessed to have a friend like Enjoli! thank you from the bottom of my heart =) I appreciate the kind and caring gesture and I enjoy the friendship!
happy "hump" day everyone!

Tuesday, October 21, 2008

Tote Bag...

I got a comment from Enjoli who told me that I was receiving an awesome RAK~ so I went to check out her blog...Stamping Under the Sun...and she had made me a tote bag. I then went to her link to this tutorial and I made one too...of course for my BFF. I used Imaginisce paper...the new line
"the fairest of them all"
the stamp set: "only ovals"
I decided to fill them with cards...
4" x 6" cards fit perfect

here's what one card looks like.

the stamp set is "Elegant Cheer"

thanks for stopping by today =)

Monday, October 20, 2008

Happy 40th Anniversary...

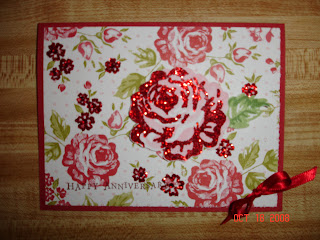
so my mom asked me this weekend to make her a card for her good friend who will be celebrating their 40th anniversary! WOW! I said okay...but I had to do some research about the "4oth" anniversary...this is what I found...40th Anniversary Color: Ruby red. Ways to Celebrate Your 40th Anniversary: Use sparkly ruby red glitter on flowers, cards, centerpieces, gift wrap, balloons, etc. Set the table with a paper ruby red tablecloth, rent china and crystal with a ruby red trim or tint, use ruby red looking votive candles, place flowers in ruby redcolored vases. So I thought...okay what can I make that shows RUBY RED! here's what I came up with...I used bella rose DSP and the stamp set is: A rose is a rose. I then used glue and red glitter to trace the flowers...used red bling for the middles and added the little red ribbon in the corner...I stamped it with the words: Happy Anniversary.
here I tried to show you a side view of the tiny flowers up close...the picture didn't come out clear enough, but I love this card! I had fun making it.
I hope you have a great week and an awesome Monday!

Creations Unlimited...

so on Saturday...I went to Wahiawa to check out Creations Unlimited...and as usual I spent some bucks! but the things I buy there are mostly exclusive there and can only be bought there. I always have a blast when I visit Norice and gang... here she designed a wallet gift card holder...
with her new line of designs...isn't that girl so cute!

look at all that work she had to do to put those tiny hearts on!
isn't this a cute idea? it has a belt to keep it closed...
here's what it looks like on the inside...you can put cash or gift card or both if you like! what a great idea for a little girl...or just a gift to give away =)
TTFN...will post something later on today!

Friday, October 17, 2008

Simple Gift Card Holder...

I found this gift card holder on SCS...it's pretty simple and easy to make! if you go to this Stampalicious blog site...you can get the instructions... 4" width x 12" height cardstock
score at: 4" and 8 " (you should have 3 even squares)
then score the middle square diagonally-top left to bottom right - fold on the diagonal line back and there you have it.
use your tape runner or double sided tape to hold where the gift card will go. don't tape the opening where the gift card will go. decorate the front and inside accordingly.
I used the dragonfly from whipper snapper.

here I used the scallop punches and circle punches to design the inside. it was so simple and easy to make and it came out so cute.

have a great Friday everyone!

Thursday, October 16, 2008

Another LCWC #13...

so last night I decided that I better get a move on my October RAK and get it going and mail it out soon...but I didn't make a card yet...I love this "Hello"ween Kitty and decided to make the card out of her! then I was looking at the colors and said...hey, I can make another card for Jen's color challenge...how cool is that?! so I used the sizzix bigz for the scallop circle and the inside circle. the last circle was used with my giga circle punch. I printed the "hello"ween kitty out and blinged her ribbon! I used some of my new halloween paper from Michelle. I then realized all I needed was some blue and brown...so I added the brown bling and some blue!
I thought it wouldn't be finished without the ribbon...
added that and she came out so cute!
as always thanks for stopping by =)

Lucky ME...

Michelle went on a trip and I got spoiled...lol! I am overwhelmed with what I got! I love it all. I even got a hello kitty halloween coaster post-it-note! she knew I needed some halloween paper...
ask and you shall receive =)
for everyday that passes...I truly count my blessings and know that I am surrounded by such wonderful friends who come and visit me...daily/once in a while/or just passing through =)

Tuesday, October 14, 2008

LCWC #13...

here is the LCWC #13 challenge for this week...
it's a color combo challenge!
here are the colors you are supposed to use for this challenge...
here's my card...I used chocolate chip ink to stamp my image...I used close to cocoa, pumpkin pie, whisper white and wild wasabi cardstock and used the stylized flowers cuttlebug embossing folder.
I used blue grosgrain ribbon from ben franklin.
I punched out the circle scallop punch and 1 3/8" circle and
stamped the word "SURFS UP" with a letter set I have,
used swirls for the background and used the white gel pen from SU.
I colored the hair with close to cocoa & creamy caramel and
used bronze glitter from martha stewart on her hair...
I colored her clothes in barely banana and colored the flowers
with only orange & blinged the middle with yellow gemstones from hero arts...
I colored the surfboard gable green and the water I used
ballet blue & bashful blue and glittered it with waterslide
by making memories...
I also used the glass dew drops that Teri gave me called sunflowers.
thanks Teri!

here's the stamp I used...it's called BEACH GIRL from Penny Black. Teri gave it to my daughter a while ago, but I found it and thought that this would be the perfect stamp for this challenge...I love it! hope you all join in and try the challenge...it's so much fun!


oh, BTW...if you go to Jen's site...Pieces of Me...you can save on all her goodies by using this code when you check out. she has such great things!
As always...thanks for stopping by...have a wonderful Tuesday!

Halloween is coming up...

Monday, October 13, 2008

Checkbook cover w/ Shaker box Tutorial...

here is my first tutorial...so bear with me gang...
I decided to make a hello kitty checkbook cover
with a shaker box.
the supplies you will need:
cardstock
designer paper
plastic window
check book cover
corner rounder
double sided tape
double sided foam tape
coluzzle (or something to make your window with)
big shot or a machine that can cut your die
hello kitty die or whatever you choose for your picture
here I chose pretty in pink cardstock
6 1/4" is the width and 6 3/4" is the height

you need to use the corner rounder so that the paper will fit in your checkbook cover
I have a big shot and used it to cut the hello kitty die I am using only the hello kitty head of the sitting hello kitty die
here is what it looks like once it's finished...I had to cut black cardstock for the whiskers and eyes...so saffron for the nose and designer paper for the bow

I have a coluzzle and used it to make my window
depending on the size of your picture...the window can be either bigger or smaller, but remember what you are making it for so that it will fit...either for a checkbook cover, card or whatever you are adding your shaker box to
make sure your plastic window is a little bigger than the opening...
make sure your foam tape touches at all four corners
this is what is sealing in your beads, glitter or whatever you choose to make your box shake!

I chose to use the chunky glitter from SU for my shaker box

you need to peel off the backing of the tape first
before adding your glitter or beads...
this will help you keep the glitter in the middle
and not getting it stuck all over the place

I used white cardstock for the backing of the hello kitty head...I had to measure the cardstock to cover the opening of the shaker box. this one was 4 1/4" width x 3 1/4" height. I stamped it with pretty in pink ink with swirls

so I added the picture to the shaker box

make sure you measure the designer paper to be a little bigger than your design because you have to fold the edges over on the back so it gives it a finished look.

here I added the hello kitty shaker box to my cardstock and then I added that to the plastic checkbook cover. there you go...it's done!

I hope you could follow along and make one too. this was fun and I love sharing my ideas with you too. have a good Monday!

Related Posts with Thumbnails