So I got a comment from Eunice who wanted to know the steps on how to make these...I thought what a great idea for me to do a tutorial and a post on my blog at the same time...so here's to you Eunice...I hope this helps you =)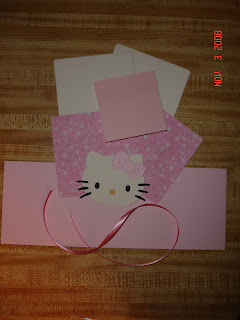 here is all the supplies you will need:
here is all the supplies you will need:2 - 4" x 4" coasters
2 - 4" x 4" designer paper
4" x 8 1/2" cardstock
3" x 3" post it note
corner rounder
scorer
tape runner/double stick tape
ribbon (optional)
hello kitty head (optional)
 first use your corner rounder to round the designer paper,
the used your tape runner to tape down the designer paper to the coaster.
 secondly, take your corner rounder and round the edges of your 4" x 8 1/2" cardstock
 next you will score your 4" x 8 1/2" cardstock at:
4" and 4 1/2"...
 then you will flip over your cardstock and double stick tape your two sides
(just as it's shown in the picture)
 so here's what it will look like when you taped down one side of the cardstock to your coaster. make sure you are taping down the cardstock to the side that doesn't have your designer paper.
 here's a picture of it when both of your coasters are taped down to the cardstock.
 then you will double stick tape your post it note down
 I added ribbon to the top for a little more pizzazz...
 lastly, you can decorate the top of your coaster post it note with whatever you may choose. I chose the hello kitty head from the sitting hello kitty diecut.
 I added a mini pen to it...
hope this helps out whoever may want to make this easy gift! I have so much fun making these and the hello kitty makes it look all the more cuter!
thanks for stopping by today!
Happy Election Day!!


11 comments:
Thanks for the tutorial, Joy, and I hope there will be more. I love all the stuff you make, especially the Hello Kitty ones.
Great tutorial. I'll need to try this.
Thanks for sharing Joy. Great tutorial. I used the one you gave me for work. And I nearly cried when I took it out of my scrub pocket cause the ribbon got undone... aaahhhh. It's ok though I fixed it and never again did I bring it to work after the horrid event. heheheheh
Hope you're havin' a super tuesday...
Jackielou
Great tutorial! I'm gonna have to try this! TFS!!!
Great tutorial Joy!! =) Those post-it notes are sooooooo cute.
Very, very cute! I might have to give this one a try myself...got tons of coasters!! :0)
Thanks for the great tutorial - I also was trying to make one but couldn't figure it out w/the earlier measurements - so thanks for showing! They are soo cute!
Wow! great tutorial joy! thanks for doing this for us and sharing your secrets! good seeing you, mom and taelyn today :) xoxo
Yea!!! and Hurray!!! Thank you so much for the great tutorial, Joy. I so want to make these for little Christmas gifts... (now, to find some time!)
Thank you for this tutorial Joy!! I'm going to have to make this one now, especially since I have coasters and the Hello Kitty die cut!!! Thank you for being my inspiration!!
i made this yesterday and it was super cute and easy!! thanks!!!!
Post a Comment