Hello everyone! Hope you all had a wonderful weekend! here's to starting a new week! My GGF Teri...Big Ideas from a Little Girl...got a wonderful birthday card and so we wanted to try see if we could make it! of course I said I would try it out! So Teri was right...it's a whole 12" x 12" sheet of DP or CS...which ever you decide to use. I used Heidi in the flowers from CC designs, used my oval nesties, colored with my copics, added some bling and used some dazzling diamonds!
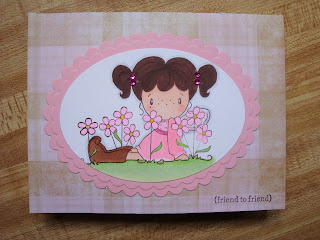 it can be a folder or an envelope...Teri's had a pull out card with a GC attached to it...I decided to make it into an image folder to give away! I used my marvy uchida punches and the sentiment from SU.
here's what the inside looks like...
 it can be a folder or an envelope...Teri's had a pull out card with a GC attached to it...I decided to make it into an image folder to give away! I used my marvy uchida punches and the sentiment from SU.
here's what the inside looks like...
 it wasn't too bad figuring out the measurements...
here I go...so on one 12" side...
score @ 3 1/4" then flip and do the other side @ 3 1/4"
then score the other 12" side...
4 1/4", 8 1/2" and 10 1/2"
this side you'll be cutting the score lines up to the 3 1/4" on both sides. so now you have flaps. the top flaps...4 1/4"...double stick tape down together. that is where you can decorate more or put a sentiment or message there...as you can see I have pink CS covering that area.
the second flaps...between the 4 1/4" and 8 1/2" score line...you will fold in diagonally...top corners down...then fold flaps in. this makes it look like an envelope.
then the flaps between the 8 1/2" and 10 1/2" score lines...fold in.
the last flaps...cut off...then the tab that's left (middle) fold on the 10 1/2" score line down. then the bottom corners...fold in diagonally. fold up on the 8 1/2" score line...to make the bottom half of the envelope. You will only be adding double stick tape on that flap that's being folded up.
I hope you can understand what I'm talking about.
thanks for stopping by!
have a wonderful Monday!










24 comments:
Hi Joy!! hope you're enjoying the weekend! Beautiful creation! I like it (thumbs up)!! TFS!!
Oooo, I totally like this! Very cute!
TFS :*) Enjoy the rest of your weekend!!!
~ margie
What another cute idea! When do you find the time to come up with all your creations?
hey joy! man, are you awesome! always figuring out measurements, etc. I'm going to try it out!
have a good one!
Your so good at "making", I totally love visiting your blog for ideas, and if you dont mind Im gonna try one of those, I want to share some images with a friend. Such a cute image holder. Have a great weekend.
This is a cute card Teri received, and thanks to your patience, you were able to figure out how to make this card. You write instructions very well and I'm glad you love doing this kind of stuff. I think you should be called our Tutor of Tutorials!!! Hugs, Cami
There you go again, making something so cute and unique! Love this idea Joy! TFS ~Hugs
This is so cool! I am going to have to try it when I get a chance!
Cute card! I gotta try it out soon!!
Hi Joy! Sooo cute!! Thanks for the tutorial - love that Heidi stamp!
ManLe
BTW - the butterflies were an image on my computer that I cut with my Craft Robo. =)
Gorgeous card Joy, such a great design and i lov ethe cute image. Hope you have a great Sunday. Hugs Nikki x
Wow you are so smart in figuring out the measurements! :) I can copy tutorials, but I can't just look at something and do it on my own! :( great job as always!
super SWEET!!! Have a great week!
So beautiful card! Nice job, TFS :)
Wholly, a whole 12x12 piece of paper, that is crazy! Super cute! Got to know how to make this one. Is it hard? TTYL!
This is adorable! Love what you did with the paper oh and image...super cute!
OMG, you are the Math Queen! Hey, you gotta show me how to make this in person! Have a great week at work! Take Care Sister!
WOW! You are amazing, as usual...my HERO!
Wow, This card is too cute. So creative!! Thanks for sharing he demensions. I will have to try it out! =) Hugs, Enjoli
That is so cool that you were able to figure it out! Love the creation that you made!!
Hugs
Jodi =)
Your so good with CREATING!Thanks for sharing your ideas. If you dont mind, I might try it! Oh, I totally love you Manga image, I wish they re-stock that image so i can order one. She is so cute!!I totally love Anime stamps!
OMG! You did it! Always up for "DA Challenge" eh? Thanks for figuring this out! Now I need a personal tutorial! say...over lunch?? Love it!!
Thank you, Sensei Joy.
Thanks for the tutorial! I had to keep reading it to get the picture and finally got it. Thanks I love it!!
Post a Comment