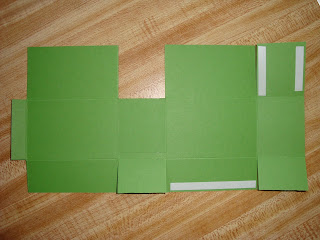
I am so sorry girls...I was so busy this end of the week...with playing in a soccer tournament and then going to this awesome craft party get together that I didn't have a chance to add in my measurements to make my favor box! so here it is...and again...I am so sorry! I just took the original measurements of a gable box and altered it a bit!
1 - 5 1/2" x 11" cardstock
 score the 11" side of CS...
1/2", 4", 5 3/4" and 9 1/4"
 score the 5 1/2" side of CS...
1 1/4" and 3 1/2"
 here...make sure you cut off the tabs on the 1/2" side...but not the middle...see here...
 cut the score lines like this...
 add adhesive on one side of the box...this will be the outside of your box...
 put adhesive on the other side...this will be the inside of your box...
 tape the middle flap down...this is the inside of your box...
 before you tape your box together...if you want to stamp a sentiment on it first...do this now before you tape your box together...you can also punch your handles now too or do it later.
 tape the next flap down inside...this is what your box looks like from the top view...
 flip your box over and take the tape off the bottom and stick together...
 then stick the other flap down to seal the bottom of your box...
 then punch your handles in and you're done!
I used the scallop oval from SU.
 hope this helps out everyone!
I had a good time making these for the gals on Saturday!
I hope they all liked it!
I will be posting other RAKS I received later!
have a wonderful Sunday!
I'm off to play a game now!
1 - 5 1/2" x 11" cardstock
 score the 11" side of CS...
1/2", 4", 5 3/4" and 9 1/4"
 score the 5 1/2" side of CS...
1 1/4" and 3 1/2"
 here...make sure you cut off the tabs on the 1/2" side...but not the middle...see here...
 cut the score lines like this...
 add adhesive on one side of the box...this will be the outside of your box...
 put adhesive on the other side...this will be the inside of your box...
 tape the middle flap down...this is the inside of your box...
 before you tape your box together...if you want to stamp a sentiment on it first...do this now before you tape your box together...you can also punch your handles now too or do it later.
 tape the next flap down inside...this is what your box looks like from the top view...
 flip your box over and take the tape off the bottom and stick together...
 then stick the other flap down to seal the bottom of your box...
 then punch your handles in and you're done!
I used the scallop oval from SU.
 hope this helps out everyone!
I had a good time making these for the gals on Saturday!
I hope they all liked it!
I will be posting other RAKS I received later!
have a wonderful Sunday!
I'm off to play a game now!


15 comments:
Thanks, Joy, for posting the tutorial. Have fun at your game.
Great tutorial. Thanks for the measurements.
~Lacey
Man, I was sitting here all weekend. Wating...waiting...waiting...nah,JK! You're so awesome to share your measurements. hmm, that didn't sound right..but, you YKWIM!! Love the box!
OMG, I thought your goodie bags was sooo adorable! Thank you for making everyone one! I can only imagine how long that took you! I'm so bummed we didn't get to chit chat!!! Hopefully you're going to the next play date? I hope so cause I plan on going and hope I can talk to those I didn't get to chat with!!!
Thanks for the tutorial! I haven't open mine up, don't wanna! LOL! Its so cute!!!
BTW Tae is soooo cute! What a great helper was she!!!
Another great tutorial Joy! Thanks for doing this. I love the one I got yesterday! Perfect size. I'm also very happy I got to meet you IRL! And Taelyn is such a joy and one smart cookie. Tell her I said hello and thank you for helping at the make n' take table!
Cami
Very helpful Tutorial...thanks for sharing. This will come in handy when I start making baby shower favors.
Hey Joy,
Hope your bind-it-all notebook never fall apart! LOL
Hope you can make the Oct. "play date"
Mahalo for the tutorial. I am going to try this one out next weekend. :-)
Hey girl-
Love the tutorial. You RAK was just beautiful.
Please give Tae a big hug from me for being so helpful. She was quite the little demonstrator. She was always making sure that I understood.
Hugs,
Janis
Glad you figured out my mistake,lol! Ugh my hamstring is starting to bruise now and am having a hard time even walking. Got and appt. with a Sports Med dr. so that I can start PT as soon as possible. So bummed :0(. Want to try and heal fast for Maui. Good luck tomorrow night....sorry I can't play.
What a great tutorial! I give you credit girl cause I have no patience to put tutorials together! LOL! The RAK you made was adorable...thank you so much for mine! It was so awesome getting to finally meet you in person although it feels like we've known each other for a super long time already! I had so much fun, too bad I had to leave early. Tae is just the cutest little thing too! I just wanna pinch her cheeks. She was awesome in helping all the ladies put their notebooks together. Can't wait to see you again!!!
Love your tutorial on this box!! It's really a very cute size!! =)
Hugs
Jodi =)
Hey Joy Girl! Now you talking girl ... this is the kind of tutorial I can follow! LOL! Thanks so much for sharing this with us ... me and math don't get along too well ... maybe I gotta take lessons from Tae! I just love her and just want to keep hugging her! Can't wait to get together again to PLAY!
Wow, you must be in total shape if you not sore after all your games! You one THUNDA girl!
Huggies,
Kyoko
KYOKO sista...you just make me roll, I tell ya. I cannot even type (hahahahahahahahahahahahahahahahahahahahahahahahahahahahahahahaha...). Okay, now let's compose ourselves. Well Joy dear, thanks for taking the time in sharing this tutorial. It's a blessing for people like me (hee, hee). I've got to agree with Chelsie, I'm not one either, to put a tutorial together. So praise God for alllll you wonderful sisters who do. It makes stamping life so much more enjoyable (lol).
Thank you, thank you, thank you for the beautiful RAK. The contents within, was wiped out!
Tae sweetie...you have blessed me beyond. I love how you took control of that whole table, the notebooks, AND allllll the aunties too =0) Great job babe!
Thanks for the great tutorial!
Post a Comment