Sunday, October 5, 2014

Mini Treat Box...

 Happy October everyone!  I can't believe I am posting after all this time...lol!  I wanted to share this easy mini treat box with your envelope punch board.  Once you know what to do...You will make plenty like I did.  I am thrilled because I am already done with all my boxes to give to co-workers, my soccer gang and my mom's friends.  I made 60 of these!  So let's get started!
Here is a picture of what the envelope punch board looks like.  It can make all different size envelopes, but I love it because it can make boxes and bags too!  This is a wonderful tool to have!
This is where you start.  You will get a your DP of any kind.  I chose the new doodle bug Halloween paper called Ghouls and Goodies.  It's double sided.  This is a 6" x 6" paper.  What is good about this is that if you by a 12" x 12" paper you can make 4 of these with one sheet!  No wasting of any kind!
 As you can see it's already scored and punched where it should be.  The good thing about it is, if you play around with the dimensions, you can get bigger boxes or smaller ones.  So here we go.  You start on one side...punch and then score.  If you look back at the score board you will see that there is one line that you can score with...that's what you will be using. 
Two sides will be the same...
Here are the dimensions: punch 1 3/8" then score; punch 4" then score
Turn your paper and then punch 2" then score; punch 4 5/8" score.
You can measure up the score lines to notch on the score board and just eyeball it and punch, but I am a person who rather follow the measurements, so this is what it came out to be.
Once you are done...you will cut the score lines.  Please make sure it's the bigger side.  If not your box will not shape the way you wanted it to.  I tried to take a picture so you can see where I cut.  I am a visual person and this makes it easier.
Then you will flip your paper over and paste/tape down your little flaps.
Now you can see the flaps forming to make your box...
Don't forget that the bigger flaps you need to punch out your handles.  I used the 3/4" circle punch, but you can use anything you like.  I put them together and punched them out at one time.  You can make a template if you want to measure and punch out one at a time if you prefer.  I just did it the faster way.
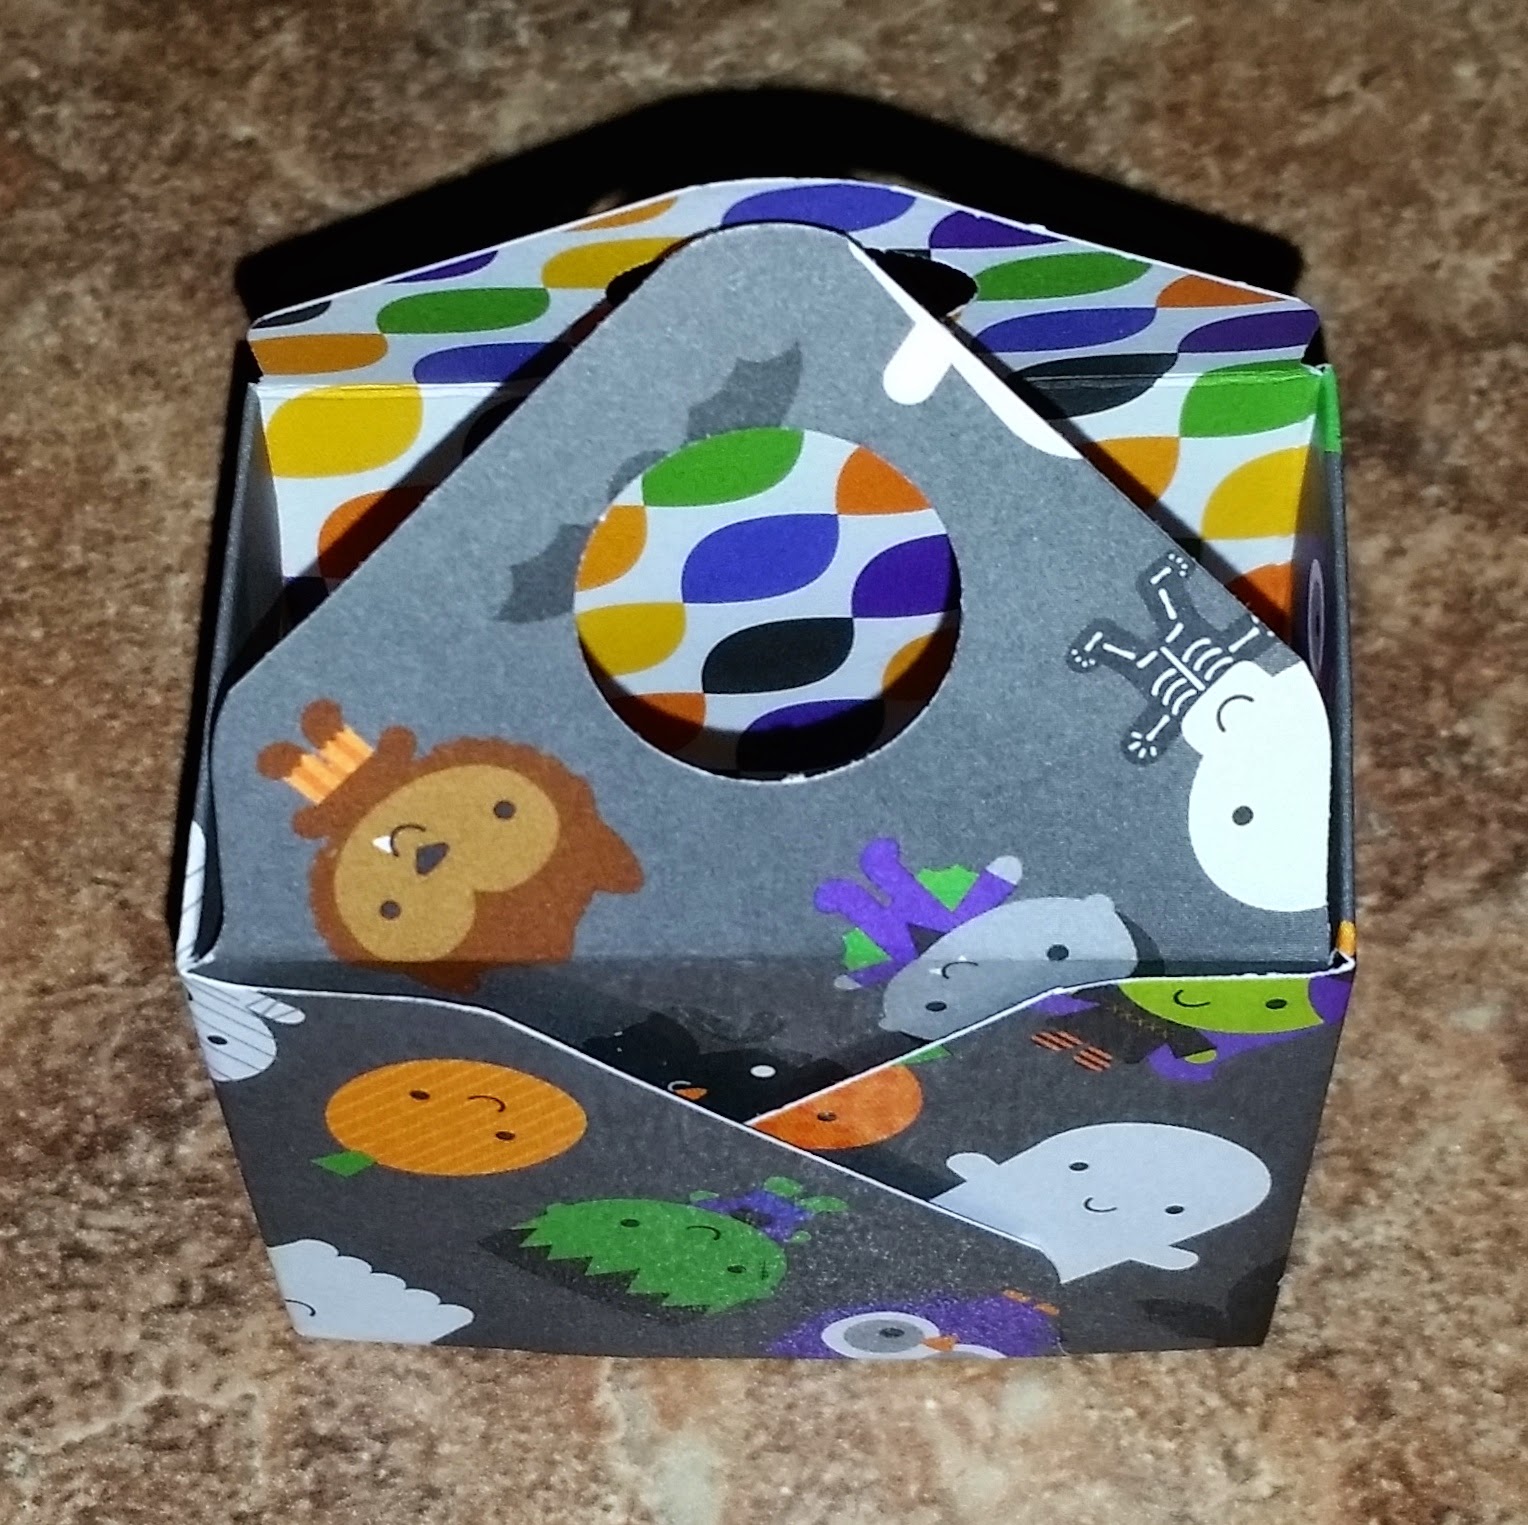
Here is what it looks like once you put it together...
 This is the top view.  If you can see I decided to tape the flaps on the outside.  This way it gives it a look of a bag in a box.  I only used little glue dots at the corners of each flap and then sealed them down.  Once you make it you will understand.
 You can decorate to your liking with ribbon, a tag or whatever you choose.
Fill with candy or goodies and you are done!

Well...Happy 2014...as the year is almost over!
Hope all is well.  Miss all of you in the blogging world!  Life has been crazy and with all that we have to do...I am glad I found the time to share this simple easy box with you!
Enjoy!

Be Blessed,

Saturday, February 1, 2014

Garage Sale for my U14 soccer girls...


PUOHALA ELEM SCHOOL
SATURDAY, FEBRUARY 8, 2014
8:30 - 3:30 PM
Please help support our U14 soccer girls gold select go to the 
National Games in Torrance, CA this summer!!  


Be Blessed,

Sunday, October 27, 2013

Hallobean...

 ...TOP NOTE BOX...
Halloween is right around the corner and I wanted to make something for the lady co-workers.  I didn't have to make for my soccer team mates, my daughter's soccer team or my mom's friends this year.  Thank goodness...cause I am so late!!  I wanted to make a box using my top note die.  I just made up my own box measurements...5 1/2" x 8" cardstock.  Then score at: 1", 3 1/2", 4 1/2", 7".  The other way you score 1" on both sides.  cut the flaps to create the box...that's it.  Here is what it looks like once assembled...
This is what I came up with...just used two top note dies for the top and the bottom of my box.  Then I used my circle and scallop circle spellbinders for my cut out and I used my Hallobean from TGF.  I colored her up and DONE!!
 I did add ribbon to hold the box shut.  I created twelve of these.  I may make more now.  Haha...it's always easier once you know what you want to do.
 Have a happy Halloween everyone!  Can't believe another year is going by!
Please have a fun time, but be safe!

Be Blessed,

Thursday, October 3, 2013

Origami Diamond Fold Card...

...SHINE LIKE A STAR...
I made this a while back for a dear sweet friend that celebrated her birthday in March.  I wanted to make a special/unique card just for her.
I found this card here...
This is what it looks like on the front...
here's a picture with the flaps open...
Of course I had to add some coloring to it...so I stamped an image from TGF and added this cute bean to the back of the card.
here's what it looks like from the back once the entire card is opened...
Hope you have a chance to make one!
Have a wonderful day :)

Be Blessed,

Wednesday, October 2, 2013

Flutter Anya...

...IT'S TIME TO CELEBRATE...
Happy 1st Birthday to Shanel...one of my dear friend's daughter.  They are throwing her a birthday party, but we can't attend.  But I wanted to send her something.  So I decided to make a shaker card with her gift.  This is how it turned out...
 
I used lots of micro beads, added flowers, ribbon, a heart charm, bling and used that ever so cute Flutter Anya from TGF.  She is adorable.  Colored her with my copics and splashed her with some sparkle spray and put it together and I am done.  Hope her mom and dad like it :)

Have a good HUMP day everyone!!!

Be Blessed,

Sunday, August 4, 2013

Double sided zig zag card...

...HAPPY CHEEKY BIRTHDAY...
 I wanted to make a unique card and wish a Happy Birthday to a dear friend!   I went searching the internet and found a double sided zigzag card.  I figured out how to decorate it too.  I decided to use the new "Cheeky Lessons" from TGF.  I colored her with my copics and used some stickles.  I made my belly band with a punch. This is what it looks like when it's closed...
Here is the first flap when opened up...
this is what it looks like once it's fully opened...
I decided to stand it up to give you a sense of what it looks like.
I hope my friend enjoys the card.  I hardly make cards unless I need to.  But this is for her birthday and I wanted to make it special.

Have a wonderful weekend!
Thanks for stopping by :)

Be Blessed,

Saturday, August 3, 2013

TGF Composition books...

...SCHOOL IS BACK...
 It's that time again...my daughter is going back to school.  She will be starting the 8th grade soon and she wanted me to decorate her composition books.  I said okay.  Then what does she pick?  The greeting farm...but the set with 3 girls!  I told her that is so much coloring and I am not so good at that.  Well I gave it a whirl.  Here are the 4 books I made. 
here is another set I used...
 here's my favorite set..."Hats off"  They are so cute!
 Last but not least...this is an old set from TGF.
 I used the words/sentiments from Word Art by Bethany.
I downloaded the different friendship sayings and then printed them out.

WOW...time sure flies when you are taking care of LIFE!
Hope to post from time to time.
till next time...LIVE LIFE AS IT'S YOUR LAST...
ENJOY EVERY MOMENT...LIVE WITH NO REGRETS.
toodles!!

Be Blessed,

Saturday, June 15, 2013

Owl Match Boxes...

 ...OWL you giving a HOOT...
It's almost time for my family reunion again in Vegas and so I wanted to make something cute!  I made match boxes with these cute owls to top them off.  I used really pretty DP but you can't see it as the owl covers the enter top of the box!  I made a total of 26...3 are for friends here.
Here is one single owl...
 this is what it looks like once the little drawer gets pulled open. 
I found these paper soaps at Pier 1 Imports here in Hawaii!
They come in different smells and I thought this would be a unique gift.
Just in case you get stuck somewhere with only running water...lol!
 Oh my goodness...it's been like forever since I posted.
I finally found some time to post the latest things I have been creating.
I am now mostly posting them on FB.  So if not you can see all my creations there!
Have a wonderful weekend!

Be Blessed,

Wednesday, November 7, 2012

Here comes the bride...

...CONGRATULATIONS...
Happy Hump Day Everyone!  Did you survive the elections?  Thank goodness it's over.  Any whoo...I wanted to share with you a card I made.  I will be going to one of my BFFs wedding this Saturday and I really wanted to make her a special card.  Her colors are magenta and charcoal gray.  I loved the colors she picked, but it was hard for me to figure out what to do.  I went to "google" some others cards and then came up with my own.  I decided to use TGF image...really cute.  Then I went to town...with layers, embossing, bling, sparkle, flowers and I even used tulle.  Put it together and voila!  my card is complete.  I am pretty pleased with how it turned out.
I even decorated the inside...a little any way.  
"May today be the beginning of a love that lasts forever"
I hope she likes her card.  I am so excited for her.  
I hope this unity will last forever and that the guy she chose is "the one".  
Have a wonderful week.
Thanks for stopping by and for all the love and support.
Till next time...remember that life is supposed to be fun :)

Be Blessed,

Friday, November 2, 2012

Believe...

 ...FRIENDSHIP...
How is everyone's week going?  Happy Friday!  I finally get a chance to share another card with you.  I wanted to say thank you to a dear special friend who I met through this crafting/blogging world and is now part of my crafting sisters!  She stopped by and shared a few goodies with my daughter and I and I can't thank her and her hubby enough!  We are truly blessed!  So I decided I better make a card.  I used this cute bean called "bright".  She was too sweet to pass up!  I used some pretty flowers and added some shimmer to finish it off.

I miss all of you.  I wish I had time, but at my new job I can't look at the internet at all.  so when I get a chance...I will post again and hopefully stop by your blogs.
Have a wonderful weekend!

Be Blessed,
Related Posts with Thumbnails